Wednesday, June 15, 2016

OnePlus 3 Everything you need to know


The OnePlus 3 has officially launched. We now know all of the major details about the new handset so here’s the full list of OnePlus 3 specs:

  • 5.5-inch screen
  • 1,920 x 1,080 pixel display (401ppi)
  • Dimensions: 152.7 x 74.7 x 7.4mm
  • Weight: 158 grams
  • Qualcomm Snapdragon 820 processor
  • Adreno 530 GPU
  • 6GB RAM
  • 64GB storage (32GB variant may be offered in some markets)
  • 16MP main camera
  • 8MP selfie camera
  • USB-C port (Dash Charge 5V/4A)
  • 3,000mAh battery
  • Fingerprint scanner
  • NFC
  • Dual-SIM
  • 3.5mm headphone jack
  • Oxygen OS (Android 6.0.1)

ONEPLUS 3 SPECS

The OnePlus 3 comes a robust 6GB of RAM and 64GB of storage. In terms of processing power, the new handset packs in a Qualcomm Snapdragon 820 chip – the same processor that can be found in many top-end handsets, including US versions of the Galaxy S7. That should ensure some seriously speedy performance, especially in combination with the 6GB of RAM.
And when it comes to the display, there's lots to be excited about. Although OnePlus has kept the resolution at 1080p, the 5.5-inch screen is now made using AMOLED technology. That means each individual pixel emits its own light, as opposed to LCD, which uses a backlight to illuminate the pixels. It should result in deeper blacks, more vibrant colours, and better energy efficiency.

The 5.5-inch screen is the same form factor as the iPhone 6S Plus, which means it’s near the top-end of what most people are willing to hold. Unfortunately, the Full HD display won’t be as VR-capable as QHD rivals, like the Galaxy S7.
Still, it's great to see OLED tech finally make it to the OnePlus series and the Full HD display and 401ppi density is going to offer more than enough sharpness for the average user.

ONEPLUS 3 – CAMERA

OnePlus has also loaded its new handset with a 16-megapixel rear camera. That's more than the Galaxy S7 but, as we've seen with several phones this year, more pixels doesn't always mean better photos. We'll have to wait until we get our hands on a review model to see how the OnePlus 3 camera stacks up against others on the market.
The new sensor also features optical image stabilisation (OIS), which should make for sharper shots.
We've seen a number of official camera samples from OnePlus in the run up to the OnePlus 3 launch. Bear in mind that these images may have been taken on pre-production models, and thus aren't necessarily representative of the final product
On the front of the OnePlus 3 you'll find an 8MP selfie shooter, which, again, is more megapixels than you'll find on top-end handsets such as the S7, but as always, we'll have to wait until we can put the sensor through its paces to see what that amounts to in practice.

ONEPLUS 3 SOFTWARE – ANDROID 6.0, CERTAINLY NOT ANDROID N

The OnePlus 3 is going to run Android 6.0.1 with OnePlus' Oxygen OS skin overlaid. Thankfully OnePlus has always done this well in the past, adding just enough new software tweaks to keep it fresh without taking away from what makes Android great.
The release comes far too soon for Android N, which is set to be the next version of Google’s OS. You can install N on a bunch of Nexus device right now, but it’s very much a beta and won’t hit consumer devices until later in 2016.

ONEPLUS 3 – BATTERY LIFE

The OnePlus 2 offered a formidable day-and-a-half of usage between charges, which is par for the course with flagship phones.
That was thanks to a 3,300mAh battery, paired with reasonably efficient components like a Full HD display and the Snapdragon 810. The OnePlus 3 has a slightly smaller 3,000mAh battery, but seeing as it hasn't made the jump to a QHD or 4K panel, we’d expect to see similar battery life once again.

Websites to Download Free Textures & Patterns


As a creative designer, I feel the need myself. Skimming through tens of hundreds of textures from various sources every time when I need specific textures is repetitive. So, today I have collected 11 best websites where I can download quality texture resources and can go back to them when I need any specific textures  I hope this collection will also be useful to you.

There are also several design blogs that offer free texture packs, for example you can see our textures and backgrounds section where you’ll find a number of high quality textures.

Importantly, each website / blog listed below has its own terms of use. So, you are requested to check their license carefully before downloading and using their textures / patterns in your designs and prints.

Lost and Taken

Lost and taken is a blog dedicated to free textures. Run by Caleb Kimbrough, the blog offers various textures in the categories of paper, grunge, wood, scratched, metal and more.


BittBox

Bittbox offers royalty free textures that can be used for both personal and commercial projects. It also provides occasional articles and giveaways.

Subtle Patterns

Curated by Atle Mo, Subtle Patterns provides high quality tilable textured patterns free for use by designers and developers.

Texture King

Texture King is another website providing high quality free stock textures.

Deviant Art

Deviant Art is a popular design community where there are a number of design resources available for free. In addition to showcasing and selling their works, various designers and artists from across the world share their free textures and patterns to the members and non-members all the world over.

Grunge Textures

This site provides high quality background textures for photographers, digital arts and creative designers. Free textures are available in 900×600 px size, and higher resolution textures can be purchased for a small fee. They also sell texture bundles for a discounted price.

Mayang Textures

Their texture library has over 4350 free to download, high-resolution textures. Also, you can buy every texture on this website for $33.

Texture Mate

TextureMate is run by Bill Scott, a photography hobbyist who photographs textures and release them free on this site. The site also features free bundles of patterns and brushes. Nice collection!

CG Textures

This site has a large number of textures. However, before you download the textures, you should carefully read their FAQ and License pages.

Free Stock Textures

They have hundreds of category-wise textures. They also have colors option where you have find textures based on colors.

Background Labs

Background Labs specializes in a variety of free background tilable patterns. You can browse patterns by colors and categories.

Free Seamless Textures

This site has a growing collection of seamless textures, backgrounds and patterns for your web and graphic design projects.

How To Make An Impressive User Interface with Qualities


User interface is that thing, which makes the interaction between the user and the application or a website. So making it perfectly is very important for every software designer. There are some important facts in this regard. You will have to remember that creating a perfect user interface does not depend on how the interface looks. The main thing about the user interface is it should be friendly with the user. There will be no complication. More over the look should also have a good look. There are seven simple ways to make a user interface perfect. You will have to follow the instructions to create a perfect interface.


These instructions are given below that will help you to create an awesome user interface :

1. Make it simple:
The user interface you are making should have to be simple. You will have to make the interface clear. There will be no unnecessary button in the interface. You will have to make sure that the user will not need any manual to use it. The interface should have visual clarity and simplicity.

2. No unnecessary data
There will be no unnecessary data in the interface. You will have to make the interface user friendly, but that do not mean that you will keep everything open on the interface. In that case, it will be disgusting for the user. So simplify it, but do not make it simplest.

3. Proper communication with the user
Communication with the user is very necessary. Those who will be using the interface for the first time will not know everything about it. So the buttons you will use in the interface will have to be familiar. You will have to those kinds of buttons, which make the user feel that this button is only for navigation or menu.

4. Make it speedy
Another very important thing about the interface that ot should have proper processing speed. If it takes, too much time for processing the commands, then it will not be welcomed by the users. So the user interface should have to be the speed to make everything in time. If the speed is not good enough, then the users will be boarded at the time of using it.

5. Easy to understand
There will be no complication in the interface. It should be created in such a way that the user will be able to understand everything, if he use only a few minutes for it. You will have to use the same type of interface in every part of the same application. If the interface is different in different places, then it will make the users angry. So try to avoid these types of problems.

6. Make the interface enjoyable
Making the interface good looking is not so important. You will have to make it is such way, which will make the user excited about the application as well as the interface.

7. Data recovery system
There is one saying that “to err is human”. So it is very common making mistakes at the time of using the interface. So you will have to keep systems for recovering data. The deleting system of the interface should have the system of restoring that data. So you will have to create something like the recycle bin in your application. Otherwise recovering data will not be possible for the users.
If you follow all of these, then you will be able to create a great interface. This will make all the users happy and your product famous. The glory will be all yours. Among these instructions, some of those can make clash with the others. You will have to solve those problems and make it perfect and that is the one and only requirements to be a software designer.

Tuesday, June 14, 2016

What is the Dark Web and Deep Web?


What is the Dark Web?

The Dark Web is a term that refers specifically to a collection of websites that are publicly visible, but hide the IP addresses of the servers that run them. Thus they can be visited by any web user, but it is very difficult to work out who is behind the sites. And you cannot find these sites using search engines.


Almost all sites on the so-called Dark Web hide their identity using the Tor encryption tool. You may know Tor for its end-user-hiding properties. You can use Tor to hide your identity, and spoof your location. When a website is run through Tor it has much the same effect.

Indeed, it multiplies the effect. To visit a site on the Dark Web that is using Tor encryption, the web user needs to be using Tor. Just as the end user's IP is bounced through several layers of encryption to appear to be at another IP address on the Tor network, so is that of the website. So there are several layers of magnitude more secrecy than the already secret act of using Tor to visit a website on the open internet - for both parties.

Not all Dark Web sites use Tor. Some use similar services such as I2P - indeed the all new Silk Road Reloaded uses this service. But the principle remains the same. The visitor has to use the same encryption tool as the site and - crucially - know where to find the site, in order to type in the URL and visit.

Infamous examples of Dark Web sites include the Silk Road and its offspring. The Silk Road was (and maybe still is) a website for the buying and selling of recreational drugs. But there are legitimate uses for the Dark Web. People operating within closed, totalitarian societies can use the Dark Web to communicate with the outside world. And given recent revelations about US- and UK government snooping on web use.

Dark Web or Deep Web? (Or Deepnet, Invisible Web, or Hidden Web?)

Although all of these terms tend to be used interchangeably, they don't refer to exactly the same thing. An element of nuance is required. The 'Deep Web' refers to all web pages that search engines cannot find. Thus the 'Deep Web' includes the 'Dark Web', but also includes all user databases, webmail pages, registration-required web forums, and pages behind paywalls. There are huge numbers of such pages, and most exist for mundane reasons.

We have a staging version of all of our websites that is blocked from being indexed by search engines, so we can check stories before we set them live. Thus for every page publicly available on this website (and there are literally millions), there is another on the Deep Web. The content management system into which I am typing this article is on the Deep Web. So that is another page for every page that is on the live site. Meanwhile our work intranet is hidden from search engines, and requires a password. It has been live for nearly 20 years, so there are plenty of pages there.
Use an online bank account? The password-protected bits are on the Deep Web. And when you consider how many pages just one Gmail account will create, you understand the sheer size of the Deep Web.

This scale is why newspapers and mainstream news outlets regularly trott out scare stories about '90 percent of the internet' consisting of the Dark Web. They are confusing the generally dodgy Dark Web with the much bigger and generally more benign Deep Web. Mixung up the act of delibarately hiding things, with that of necessarily keeping pages away from search engines for  reasons of security or user experience. 

Wait, what about the 'Dark Internet'?

Confusingly, 'Dark Internet' is also a term sometimes used to describe further examples of networks, databases or even websites that cannot be reached over the internet. In this case either for technical reasons, or because the properties contain niche information that few people will want, or in some cases because the data is private.

A basic rule of thumb is that the phrases 'Dark Web' or 'Deep Web' are typically used by tabloid newspapers to refer to dangerous secret online worlds, the 'Dark Internet' is a boring place where scientists store raw data for research. The Deep Web is a catch-all term for all web pages that are not indexed for search, the others refer to specific things.

How to access the Dark Web

Technically, this is not a difficult process. You simply need to install and use Tor. Go to www.torproject.org and download the Tor Browser Bundle, which contains all the required tools. Run the downloaded file, choose an extraction location, then open the folder and click Start Tor Browser. That's it. The Vidalia Control Panel will automatically handle the randomised network setup and, when Tor is ready, the browser will open; just close it again to disconnect from the network.

Depending on what you intend to do on the Dark Web, some users recommend placing tape over your laptop's webcam to prevent prying eyes watching you. A tinfoil hat is also an option.
The difficult thing is knowing where to look. There, reader, we leave you to your own devices and wish you good luck and safe surfing. And a warning before you go any further. Once you get into the Dark Web, you *will* be able to access those sites to which the tabloids refer. This means that you could be a click away from sites selling drugs and guns, and - frankly - even worse things.

Aggregation sites such as Reddit offer lists of links, as do several Wikis, including http://thehiddenwiki.org/  - a list that offers access to some very bad places. Have a quick look by all means, but please don't take our linking to it as an endorsement.
Also, Dark Web sites do go down from time to time, due to their dark nature. But if you want good customer service, stay out of the dark!


And do heed our warning: this article is intended as a guide to what is the Dark Web - not an endorsement or encouragement for you to start behaving in illegal or immoral behaviour.

How to Solve “insufficient storage available” on Android


There happened a huge changes in the smart phone world with in last 6 years. While HTC releasing their Dream Smart phone in 2008, none of us though that there will happen a big changes in this field. After that Many new Android OS and similar Smart Phone OS came and now we are at Lollipop version of Android. Millions of Android devices were sold all over the world. Variety and collection of application is the main reason behind the success of Android.
Every technologies or products have its own advantages and disadvantages. After migrating from traditional JAVA mobiles to Android, one of the important problem is the lack of storage. As java applications requite less than 1 MB space, we were able to install lot of applications and games. Whereas in Android, one of the biggest problem that are facing by low-end android device is the memory or storage issue. After installing some of the necessary applications like Whatsapp, Facebook and MX player, there will be no further space for other games and applications.
Last day I got a gift from my cousin. It was a BSNL penta tablet. It contains Jellybean as Android version and also have all other features of android devices. But the problem is I can’t install more than 5 apps in it. I installed necessary apps like MX player, Whatsapp, Facebook and my favorite game Clash of Clans. After that there is only a few space. After these installation, whenever I try to install a new application or game, it shows “insufficient storage available” error message and the installation gets cancelled.

I have 8GB SD card.Still insufficient storage available

Many guys confused that why they are getting this error even though they have remaining storage space in their SD card. Let me clarify it. Almost all of the android devices have two types of storage available. Internal Storage and the external Storage. Internal Storage is the place where every necessary files needed for the working of your smart phone getting stored. For example the OS is getting stored on the internal storage. Almost all of the apps were also getting stored on your Internal Storage. Not only these apps, but also their cache and data were also getting stored in these internal storage Area.
External Storage is the place where Music, Pictures, and other files getting stored. If you are taking a photo using your Mobile, then it probably get stored in the secondary storage. So if you have 64GB external storage and 512 MB internal storage, there will be no use.
We are here with some of the advanced way to resolve  insufficient storage available problemon your low price mobile or tablet.

Resolve “insufficient storage available” problem easily

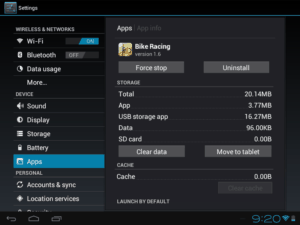
1:Uninstall unwanted apps
This is the important thing you should do if you are out of storage space. There will be many unwanted apps that are playing with your valuable storage are. First of all get rid of these apps and clean the storage. For deleting apps from your device,
  • Go to Settings
  • Apps
  • Choose Unwanted apps
  • Uninstall
shot_2014-11-26_09-20-36

Keep in mind that never delete Apps like Play Store, Play Service as those are important ones.
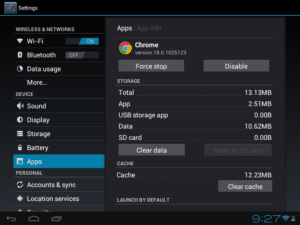
2: Clear the Cache
Cache means a temporary storage area. Think that you are browsing through a browser app. There will be chance for more cache as browsers are dealing with many types of images and other real world contents. There will be no issues for deleting the cache but you need to re download them while using the service again. For example, If you delete the cache of Facebook app, the user profiles and other icons get deleted from the internal storage and get downloaded again if you are visiting profiles again. To clear the cache
  • Go to Settings
  • Apps
  • Choose an app which have Cache [facebook, twitter, chrome etc have cache]
  • Clear cache
shot_2014-11-26_09-27-31
 3: Move apps from device to SD card
With the help of some applications, you can easily move apps that are installed in the device memory to the SD card. If you haven’t tried this yet, just make a try and see how much storage space you could save. Some apps on the app store require root permission to move apps to SD card and some others doesn’t require. You can try this app to move your apps directly to SD card without rooting your device.
Capturess
4:Move Pictures and Large files in Internal memory to the SD card
Once You remove the SD card, the whole contents like pictures you take, Downloaded files, received files etc comes under internal storage. So make a checking that whether you have large files inside your internal storage. If so move it to the SD card. Every time putting files in the SD card is more safe than putting it in the phone storage.
All the above recommendations are very effective against “insufficient storage available” problem of android device. Among them moving apps to SD card and Clearing cache are more important. Also if you have unwanted apps or games installed, get rid of them. Not only storage space but also background working apps took RAM memory and put your device very slow. Clearing the cache of your apps give some more storage space. There are also some cache cleaner apps in Play Store, which is more effective than manual Cache clearing, You can also try those apps and once cleared, uninstall them. If you know any other way to increase the storage space of android devices, please let us know. If you have some informative knowledge about this, we are happy to include it in this page.

Best Way to Build Your Website


If you’ve been reading firstandgeek.com for a while you’ve probably noticed that it’s a pleasure for us for share useful tips and resources.
And today we’re going to tell you how to build a website in the most effective way. However, it will be fair to list all possible ways first. So, here they are:
  1. You can hire a designer to create your site.
  2. You can build a website yourself.
  3. You can use a website template.
All options are Ok, but the first option is quite expensive (it may cost hundreds and sometimes thousands of dollars). The second way is also fine, but it implies that you know web design and how to do the job yourself. And the third option seems to be the best one as it requires less than $100, minimum knowledge of web design and it doesn’t take much time.
Now when you know that a website template is a wise way to get a design of your website it’s time to know what it is, actually. A website template is a ready-to-use is web page design. It’s a set of files you can use to build a brand new website or update your current site. Each template comes with default texts, images and graphics. So you’ll have to replace default content with your own content and your site will look exactly the way you want it to. Moreover, you can customize the template as much as you want. You can either do it yourself or hire a professional designer, but even if you ask the designer to customize your template, it will cost you ten times cheaper than if you would ask him to create your website from scratch.
And don’t worry, you won’t need to compromise in quality if you choose to go with a website template, there a lot of great-looking templates around (both free and premium ones). You just need to search in the right places.
For example, you can start your search at TemplateMonster. There you’ll find thousands of templates available, including HTML templates, CMS templates (WordPress themes, Joomla templates, etc), eCommerce templates (PrestaShop themes, Opencart templates, Magento themes, etc). The company has been in business since 2002, so it should come as no surprise that they have built more than 50,000 high quality templates so far. So whatever website you want to build, be it a family blog, a corporate site, a news portal, a web shop or any other website, you can easily find a design for your website at http://www.templatemonster.com.
The good thing is that TemplateMonster is following the latest web design trends. Let’s say you want to build a website on WordPress and you want your website to be enhanced with a parallax scrolling effect. That’s not a problem at all, simply head to this page and choose the design to your liking.
Of course, we do not know all your wishes so we can not suggest the right page for each of you, but the good thing is that TemplateMonster has a user-friendly navigation. You can search for the right template in a number of ways: by type (WordPress theme, HTML template, etc), category (Hosting, Real Estate, Fashion, Sport, etc), keyword, feature (responsive design, Bootsrap, WPML compatibility), color price, etc.
But maybe the best advantage of TemplateMonster is that the company provides free support on all premium templates. So, whatever question you have, you’ll get a quick and to the point answer. You can contact the Support Team by phone, ticket, or live chat.
Some of you are looking for minimalist templates; some of you want to have jQuery sliders on your sites, some of you are fond of flat design and you want your site to follow this trend. You all are so different and your hopes for your website design are also different, but we promise, you will not regret visiting TemplateMonster.com as the company is definitely good at making templates for all kinds of websites.

Conclusion

Purchasing a template is a good option if you want to build your website fast and you do not feel comfortable spending thousands of dollars on the custom design of your site. Luckily, there are so many professional looking templates around so you can easily find the perfect design for your website.

Free WiFi Hotspot Software For Windows


Internet has become somewhat an inseparable factor of daily life, ensuring internet connection in all devices we have is a tiresome task, especially when it comes to countries like India where both mobile internet and public WiFi services are yet to find their base. In this kind of situations, however, sharing internet connection by means of WiFi hotspot feature makes enough sense, as most devices including your Smartphones and computers do have WiFi in built. Although Android Smartphones offer a more direct way to switch on hotspot and share your own internet connection to multiple devices, there is no such option in Windows-based computers, making the feature a bit ‘hard’ for basic users.

In this post, we have come up with list of top 5 WiFi hotspot software for Windows PCs. Using these software, you will be able to create a WiFi hotspot in a few clicks, rather than digging into networks section of your PC. So, we should move on, right?

1. My WIFI Router (Free)

My WIFI Router is a free software to create a WiFi hotspot in your Windows PC. The tool supports Windows XP, 7 and 8 as well as both 32 and 64 bit architectures. Rather than creating a mere WiFi hotspot, My WIFI Router offers a big number of features, and some of them are:
  • Easier management of connected devices and you can limit speed, blacklist or change nicknames of devices. So, if you want to restrict some devices from stealing your browser speed, you can do that using the section for client management.
  • Ability to share your videos using WiFi so that you can access them right from your Smartphone browser. If you have switched on the ‘Share Video’ option, you will be given an IP address; you can enter the IP address to browse and play videos that are stored in a particular file folder in your PC.
Considering these features, My WIFI Router is a productive tool, indeed. Moreover, my WIFI Router has a UI that has minimal elements arranged in an easily understandable way.

2. MaryFi (Free)

MaryFi is, as the developer says, a software-based WiFi router that helps you create a WiFi hotspot and thus share the internet connection you have in your Windows PC. MaryFi is completely free to use and does support Windows 7 PCs. MaryFi has a minimal user interface and kept the same minimalistic approach in terms of features as well. So, if you just need a Wi-Fi hotspot creator, you should try MaryFi.
However, despite being simple in terms of use, MaryFi can be used as a WiFi repeater — you can use the tool to receive signals from one WiFi modem and re-propagate those signals using WiFi feature of your PC. On the other hand, if you switch on MaryFi when you do not have one internet connection with you, it will let you access shared folders of your PC from other devices as well as being part of multiplayer, LAN-based games.
And the best part is that, in spite of being free to use, MaryFi will not put some ads to disappoint your user experience.

3. MyPublicWiFi (Free)

Here comes another easy-to-use, simple-in-terms-of-feature tool to create WiFi hotspots — MyPublicWiFi. The tool is a freeware and supports Windows 7, 8 and Windows Server 2008. Since it supports both 32 and 64 bit architecture processors, MyPublicWiFi will work smoothly on Windows based devices.
  • Ability to know which devices are connected to your WiFi hotspot! So, even when you have created an open network, you will know who else are there.
  • URL Logging helps you have a list of websites that have been accessed during the hotspot session. If you think someone is accessing the hotspot to access some ‘undesired’ website, you will be able to get details on those sessions using the feature.
  • You can use the tool as a WiFi repeater in order to extend signal of your home WiFi or other situations. If you want to extend the range of your WiFi modem, you can do it in a few seconds.
  • You can use the tool as a WiFi repeater in order to extend signal of your home WiFi or other situations. If you want to extend the range of your WiFi modem, you can do it in a few seconds.

4. mHotspot (Free)

mHotspot

  • The tool, mHotspot, is something as far as you are concerned about turning your Windows-based to a WiFi hotspot and thus a source of internet. Using this easy-to-use free software, you can create a hotspot by choosing a name for hotspot, password, source of internet and number of maximum clients. mHotspot works with both Windows 7 & 8.
    • Hotspot can have up to ten clients. However, you have the option to put a restriction on number of devices that can be connected to your hotspot.
    • Ability to know details about connected Wi-Fi clients and their resource consumption
    • When compared to other WiFi hotspot creation tools out there, mHotspot has a really small size (of around 400KB) and downloading it will not be a problem even when you have a small internet connection.
    mHotspot is indeed a great choice when you need to create a feature-rich Wi-Fi hotspot without spending that much time! In addition, we loved its feature to select the source of internet before creating the hotspot.

5. Connectify (Paid)

Unlike the aforementioned hotspot creation tools, Connectify is a paid software to create WiFi hotspot, despite the fact that a free version with less features are available.
For instance, if you are going for Pro, you can remove hotspot shut-off timer and share internet from both 3G and 4G devices. So, if you are going with the basic plan, you’ll be able to share your wired internet connection. Plus, Connectify works fine with both Windows 7 and 8 PCs. When we do compare Connectify with other tools out there, however, the inability to share internet connection from a 3G or 4G device is obviously a disadvantage.  So, the rest of the software can be termed as good alternatives to Connectify because they are free and offer more features as well.

The Manual Way (Creating WiFi Hotspot without installing any software)

So, now, you have a list of top best WiFi hotspot software for Windows and these apps will let you do the job in a single click. Yet, if you are not in a situation to download these tools and create a hotspot, there is a manual method using Windows Command Prompt.
  • First, you have to open command prompt with administrative privileges. To do that, right click on Command Prompt icon and select Run as Administrator.
  • Now, we have to check whether your PC does support WiFi hotspot creation. To do so, give the following command in command prompt.
netsh wlan show drivers
  • Input of the command will show you results that are given in following image. From that, check if Hosted Network is supported. If it’s a Yes, we can move on; otherwise, you cannot create a WiFi hotspot using the method.
  • If your WiFi network card supports Hosted Networks, you can create hotspot by giving a command. In the following command, you have to change ssid value to the desired hotspot name whereas key to your desired password.
netsh wlan set hostednetwork mode=allow ssid=Hotspotname key=password
  • If it has been successful, you can see a message that hosted network mode has been set to allow and username and passphrase have been changed successfully. Now, you have successfully created your Wi-Fi hotspot but you have to switch it on first.
  • To do that, give the following command to CMD:
netsh wlan start hostednetwork
  • Similarly, when you want to turn off the hotspot, enter the following command in CMD:
netsh wlan stop hostednetwork
  • On the other hand, if you want to know the details about the Wi-Fi hotspot you have created, you can give this command:
netsh wlan show hostednetwork
Success! You have created a WiFi hotspot in your Windows-powered PC using Command Prompt! Now, if you want to share the internet connection, you have to go to Network and Sharing center and enable ‘Internet Connection Sharing to that particular network — simple as that.

To Conclude

Talking of the tools, we loved My WIFI Router very much, as it helps us create hotspot in seconds as well as to share videos over WiFi, which is a great mater of productivity. Nevertheless, we would like to know which WiFi Hotspot creation tool you are using. That having said, if you are not able to download any of these tools to create a hotspot, we hope the manual method, using Windows Command Prompt will surely help you, as each and every Windows-based PC comes with CMD.